

This vegan labneh recipe is so quick and easy and makes for such a yummy spreadable vegan cheese. It’s become a staple around our house in Abu Dhabi, loved by the adults and kids around here.
There are a million ways to enjoy it and it’s pretty healthy as well, so we’ve got no excuses to buy expensive, overly processed vegan cheeses anymore!
Okay, that’s a bit of a lie, I still buy it for it’s melting properties but this has definitely replaced at least half of what I was purchasing.
What is Labneh
Labneh is a strained yogurt cheese that is very common in the Middle East. It’s soft and spreadable with a similar consistency to cream cheese and a nice tangy, delicious flavor.
How To Make Labneh Vegan
It’s incredibly easy to make labneh vegan. All you need to do is use a vegan, plain, unsweetened yogurt. I also add a teeny bit extra flavor from other ingredients to copy that tangy flavor.


You can use a store bought vegan yogurt but I highly reccomend making your own. If you haven’t made yogurt before, that might sound scary, but it’s really so easy and you don’t need any special equipment.
We’ve got a really easy recipe for vegan Greek yogurt here. You can stop before the straining step if you are following the recipe, or use the finished product as the base for this recipe.
Vegan Labneh Ingredients
To make vegan labneh all you need is:
- Unflavored Vegan Yogurt
- Lemon Juice
- Salt
- Extra Virgin Olive Oil
(Optional)
- Za’atar
(Optional)
Making Vegan Labneh
To make vegan labneh, mix your soy yogurt, lemon juice and salt and then set it to strain. The best way to strain it is in a cheesecloth, or really any thin breathable towel, without loose fibers.
I actually repurposed one of our baby burp clothes we never used when I was short on a cheese cloth and it’s now been permanently reassigned as a cheese cloth.
Take your cheesecloth or towel and spread it over a strainer or colander. Place the whole thing over a bowl to catch the liquid that is going to come out and then pour the yogurt into the cloth. Cover with the sides of the cloth and put the whole set up in the fridge.

Let the mixture strain for 24-48 hours. You can check the consistency every so often to see if it hits the consistency you like. The longer is sits, the thicker it will get. How long it needs will also depend on how thick the yogurt you started with is.
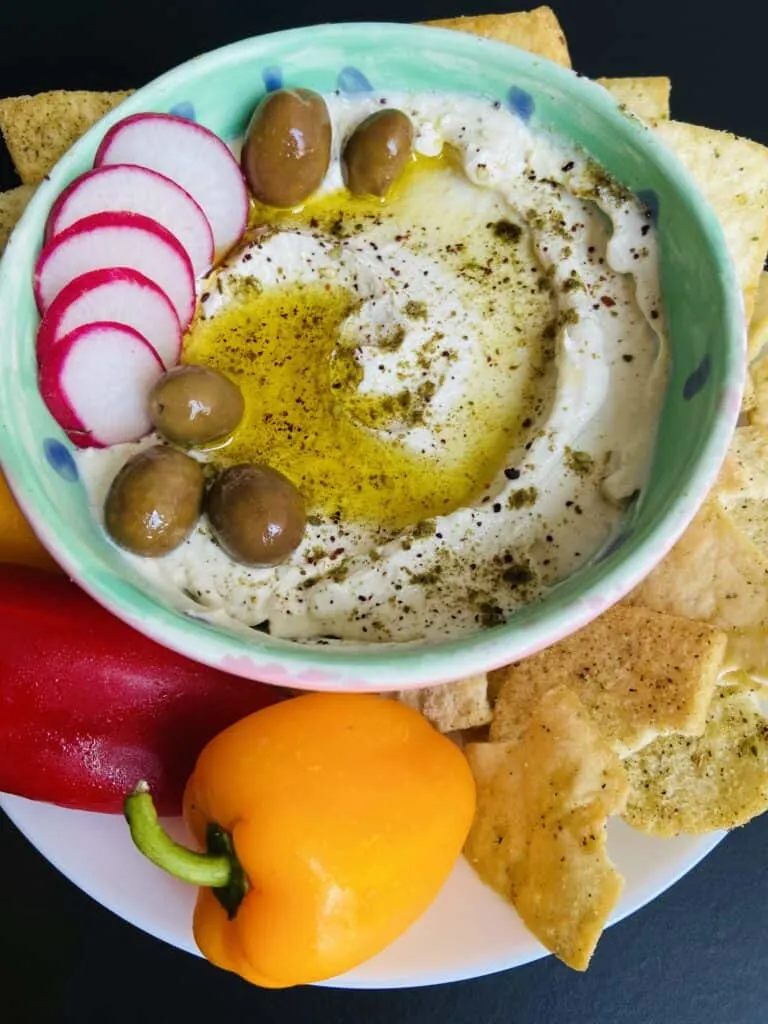
Once it’s done straining, transfer to a container or serving dish. You can enjoy it like that, or mix in the optional olive oil. I prefer it with the olive oil, so if you aren’t avoiding oil, I would recommend using it.
Drizzle a bit of olive oil on top and a generous sprinkle of za’atar. It’s not only a garnish, it tastes really, really good with the labneh.
Alternatively, another way of storing and eating Labneh would be to scoop it into balls when it’s done straining and store it in a jar of olive oil. It lasts a lot longer in the fridge this way, plus the olive oil infuses it with some amazing flavors.
How to Eat Labneh
Labneh is amazing in so many meals and dishes. You can use it as a dip or condiment with a platter of veggies, some pita chips, pretzels or anything else that’s good with dip.
It’s also amazing on top of hot pitas, toast or as a sandwich spread. You can get creative with toppings, either going with simple sandwich veg, or fancy with fruit and a balsamic drizzle. It’s really versatile, try it out and see!
It would also be really lovely served along side other Middle Eastern dishes like vegan shakshuka. For variations on the labneh itself, mix in some spicy add ins, herbs, garlic, or caramelized onions.
Don’t Forget To Pin This Recipe For Later!


Vegan Labneh
This vegan labneh is so creamy, tangy and delicious. It's the perfect spreadable vegan cheese and so quick and easy to whip up with just a few ingredients.
Serve it with warm pitas, crunchy veggies, on toast or with anything else your heart desires!
Ingredients
Instructions
- Mix together the yogurt, lemon juice, and salt.
- Place a colander or strainer into a large bowl* and line with a cheese cloth or towel (breathable with no loose fibers) and pour in the yogurt mixture.
- Cover with loose ends of the cheese cloth and put in the fridge to strain for around 24-48 hours, or until it reaches the consistency you like. How long it takes will depend on how thick the yogurt you started with was and how thick you like it.
- Once its done straining you can either scoop into balls and store in an oil packed jar or move to a container or serving dish and mix in the optional olive oil. I highly recommend using it unless you are specifically avoiding oil. Once it's mixed in, drizzle a bit of oil on top and season generously with za'atar.
- Store in an airtight container in the fridge or enjoy immediately!
Notes
*Make sure there is enough room for the liquids to drip out, the bottom of the colander should not be touching the bottom of the bowl or the liquid will have nowhere to go.
Recommended Products
As an Amazon Associate and member of other affiliate programs, I earn from qualifying purchases.
-
 Regency Wraps Natural Ultra Fine Cheesecloth 100% Cotton, For Basting Turkey and Poultry, Straining Soups and Sauces & Making Cheese, single pack, 9 Sq.Ft
 -
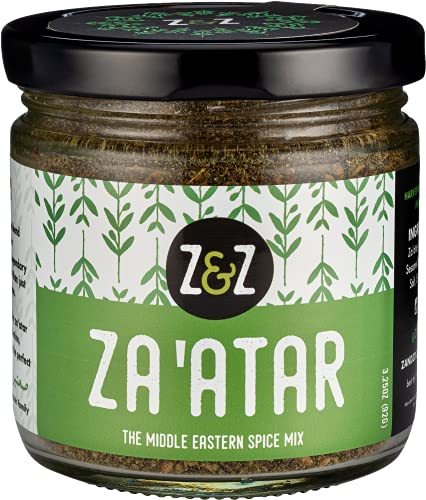 Za'atar by Z&Z (Zaatar/Zatar/Zahtar) – Eat. Good. Za'atar, 3.25oz – Middle Eastern Spice Mix you can Snack on
 -
 Lucy’s Family Owned - Lemon Juice, 32 oz. Bottle (Pack of 2)
 -
 Pompeian Organic Extra Virgin Olive Oil - 24 Ounce
Nutrition Information:
Yield: 14 Serving Size: 1Amount Per Serving: Calories: 30Total Fat: 2gSaturated Fat: 0gTrans Fat: 0gUnsaturated Fat: 1gCholesterol: 2mgSodium: 202mgCarbohydrates: 3gFiber: 0gSugar: 2gProtein: 2g
Doug Saleeby
Wednesday 6th of January 2021
I tried the labnee. my salted yogurt has been hanging in my cloth bag for over 24 hours. won't let go of water at all. no drips. did you select a certain plain dairy free yogurt that did not have certain gums or stabilizers or thickening agents that might be stopping mine from working? Have not added lemon yet. I got Kite Hill plain.
Lillian
Saturday 30th of April 2022
@Doug Saleeby, when I made homemade marscapone, the recipe had me weigh down the top of the yogurt and that will encourage the liquid to drip. Good luck! I can't wait to try this recipe myself!